Wednesday, March 27, 2013

Sempervivum; my favorite plant(s) in the garden this week!

I’m kind of cheating at my own game, picking a whole group of plants rather than a particular plant…but they just look so good mashed together here. Usually when I plant sempervivum I spread them around, giving them room to expand. Here I was trying to fill in a corner where pesky squirrels continually dug.

Are you wondering why there’s a muddy channel surrounding them in the image above? Because I’ve removed some of the brick edging to help picture the expanded planting area taking over parts of the lawn. This grouping was right at the “old” corner.

It’s so wonderful as-is that I’m going to try and move it out to the new corner en-masse.

I stopped tracking the name of my different sempervivum long ago, so I can’t tell you specifically what these are.

I have a (bad?) habit of picking up 1 or 2 Semps weekly when I grocery shop (only in the spring and summer). Our local “has everything” grocery chain (Fred Meyer) has a decent nursery for basics like this, and their prices are good, usually on sale 2 for $5. It’s an easy way to amass quite a collection!

The stats…
  • Common name: Houseleek or Hens and Chicks.
  • Most are quite frost resistant; some hardy to as low as zone 4 but they will melt in desert temperatures (a succulent for us in cooler regions!).
  • They dislike damp (although this hasn’t been a problem for me) and prefer full to partial sun.
  • They are monocarpic and will die after blooming. Usually the blooming rosette has been surrounded by smaller plants though, so death won’t mean much of an empty space in the garden.
  • Happy in containers or rock gardens, and great as a ground cover.

All material © 2009-2013 by Loree Bohl for danger garden. Unauthorized reproduction prohibited.

Tuesday, March 26, 2013

What a stupid thing to do!

Remember that Blue Atlas Cedar I was so excited to have bought? Well I did a really stupid thing and let it dry out. I went to plant it on Sunday and when I picked it up the roots came right out of its plastic nursery pot and it was light, too light. I felt the soil, bone dry. Then I looked at the needles…

Yellow! And when you touch them…

They fall off. Damn! It had been sitting up against the shade pavilion, too far back I guess to have benefited from what rain has fallen, and I didn’t think to check on it. Immediately it got good soaking.

There are still many happy clusters of blue needles. Have I ever mentioned these clusters make me think of teeny tiny Yucca rostrata? Maybe that's why I love it so.

It’s the tips that are yellowing and soon to be needle-less.

I know nothing about conifers, is it hopeless or might it bounce back? Will the needles regrow, or will it live on with bald spots? Have you ever done something this stupid? Help!

All material © 2009-2013 by Loree Bohl for danger garden. Unauthorized reproduction prohibited.

Monday, March 25, 2013

The hydrangea is gone! And the project continues…

When last we visited this corner of the garden I was having difficulty saying goodbye to the Clematis armandii 'Snowdrift' while preparing for the hydrangea to go away. Somehow I quickly got over the clematis issue, all of your advice helped, and out it came. Then I chopped away and pronounced the hydrangea “ready to move”…

On the morning of February 27th my friend and neighbor Bridget (new mom to the hydrangea) arrived ready to get to work. She quickly decided to chop it back even further...

We dug and dug, and cut roots, and dug and finally…there was movement!

Can you believe that this…

Became this…

And is now tucked in at its new home just a block away?

Pretty cool. As is this big empty spot!

It’s HUGE! (and the house painter missed a spot behind the hydrangea monster)

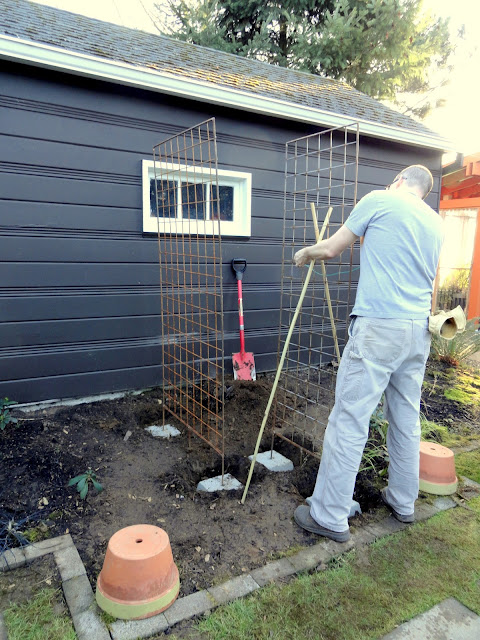
So the plan was to put in the pair of metal trellis I bought last fall (to create a divider between the front and back of this area, and create a wall that obscures the patio) and then plant! However I consulted the husband on trellis placement (having another set of eyes is good) and he pronounced them too wiggly and decided we needed to dig in and pour some footings first. You know what that means right? Can’t plant (bad thing #1) and have to deal with mixing cement (bad thing #2 and possibly my least favorite activity, next to painting over high-gloss oil based paint). Project on hold pending trip to the big box store…where (happy moment!) we discover these…

Which are much better then these which have to be cut and filled with cement…

Granted we still had to fill those tiny holes with cement to secure the trellis legs, but overall project just got waaaay easier. Back home and project underway…

The supervisor watched our every move.

And we’re done! Bamboo poles to keep the trellises straight and secure while the cement set, terra cotta pots to keep our feet from smashing emerging hosta tips.

A few days later and the trellis was firmly attached (monkeys can safely climb it, should they ever show up) and I could finally plant!

The first to go in the ground, my Clematis tibetana, which waited patiently in a large container all winter. I was a little nervous handling it, the stems are very brittle. But finally it’s in the ground!

Next came an even more nerve wracking task, moving the largest of my two Schefflera taiwaniana. After all if I screwed this up it’s not like I could just zip down to the closest nursery and pick up another one. Lila was too concerned to watch, she had to avert her eyes.

The shovel slipped right down into the soil though, and it popped out quite easily (if you're wondering why I needed to move it...I mistakenly put it in a spot where it received too much sun. In the summer it's leaves lost their dark green coloring and turned a putrid yellow).

The next thing I knew it was out and ready to position in its new home. I think it magically grew about two feet as well…

It’s been 2 weeks now since it was moved and the leaves have not drooped, even a bit. No yellowing, I’m starting to think it’s gonna be okay…

That done I wrested the Schefflera delavayi out of its container and positioned it at the front of the trellis.

This all happened none too soon as the plants that had been sleeping are starting to wake up. Hostas…

Solomon's seal…

And the previously mentioned Shredded Umbrella plant.

You can see a couple of hellebores were moved to the front of the bed, and there’s a Disporum cantoniense there waiting on future purchases to determine its placement (I need to do a little plant shopping!)…

I want to find a couple of these dark ferns like I saw at Scott’s garden last summer, and I think I’ll move the Persicaria ‘brushstrokes’ over here too (picture taken at Rhone Street Gardens).

I’m thrilled to have this part of the garden start to reflect my style more than the hydrangea ever did. I am a little bothered by the fact I can stand on the steps at the back door and see all the way to the patio, which was never possible before, however I’m sure it’s just a matter of time before things fill in…best of all some of these new plants are evergreen and I won’t have to look at the leafless hydrangea sticks next winter! (to be continued after a few more plants are added to the mix…)

All material © 2009-2013 by Loree Bohl for danger garden. Unauthorized reproduction prohibited.

Friday, March 22, 2013

Everyone starts seeds on their stove right?

Seed starting appears to be one of my coping mechanisms for winter. I get the urge sometime in January or February, things start out well enough but then “real” gardening commences (yes I realize how ridiculous that sounds) and the seeds are forgotten. I think the only thing I’ve successfully grown on to plant-out in my garden is a handful of purple Ricinus (sown directly in the soil vegetable seeds don’t count). Last year I even started a bunch of agave seeds, several of which germinated, but then I lost interest once I could be outside working in the garden.

So true-to-form this year I’ve planted a few seeds, there is a twist though, these were all seeds collected from plants in my garden. That’s taking it up a notch right? Since my seedy endeavors can only be described as half-hearted at best I don’t have a lot of fancy seed starting equipment (trays, warming mats, lights) so that’s where the stove comes in! (I know, it’s a good thing I have an understanding spouse)…

I figure since I typically heat up the oven daily, that’s heat that could be used to help the seeds germinate (I suppose I should mention it's not a gas appliance). Plus they are right there in my face so I don’t forget to water them, and with the high watt bulb in the stove hood they’ve got a bit of extra light too.

Of course on occasion we have a sunny day and I want to move them outside to soak up the heat on the warm concrete, or maybe I need access to more than 2 burners on the stove. That’s when this kitchen rack from IKEA comes in handy. I can just pick them up and move them!

I know, this is all a little strange…but look! The Echium russicum seeds are sprouting!

So far there’s nothing from the Euphorbia lathyris, Asphodeline lutea or Eryngium giganteum…

All material © 2009-2013 by Loree Bohl for danger garden. Unauthorized reproduction prohibited.

Thursday, March 21, 2013

A few things around town that have caught my eye…


Originally I planned to call this post “an opuntia named Harold” but decided that wasn’t fair to all the other plants I have pictures of. Harold and his friends occupy a rather overgrown hell-strip in SE Portland.

They suffer the indignities of being held up by tomato cages…

And being buried under misbehaving neighbors.

I wonder what Harold and his friends would do if they were transplanted here? To what is perhaps the smallest hell-strip in all of Portland…

Here we have a hell-strip full of Bergenia and cloud pruning.

I wonder, is this style of driveway strictly a Portland thing? I’ve never seen it anywhere else, at least not that I can remember.

While house hunting we looked at a few homes with driveways like this and the thought of pulling into one gave me shivers.

Did you notice the extreme planting in the first driveway example? Here’s another version.

I could almost hear the little Arum italicum leaves “must grow...must reach the sunshine”

Yes those really are rocks.

And yes they felt just like you think they would.

Loved this combo of colors and textures.

And the same here. The green-ness of it all along with the texture of the rocks and the climber…I stared at it for far too long.

This looks almost like an opunita farming operation!

Although they needed to do a little weeding, carefully.

Moss on opunita, that’s not something you see every day.

It really was quite beautiful, with the pink fruits and blue green pads.

Just down the street I discovered the largest weeping Blue Atlas Cedar I’ve ever seen. It was horrifying, these plants really give me the creeps and this one was HUGE! It started on the north end of the property at the sidewalk and continued back to the house, along the entire length of the house, the garage, and then back to the sidewalk on the south end of the property. How long did that take?

Someone with a sense of humor lives here though…

And they like euphorbia…

That is a sexy cone.

Finally I end with another opuntia farm.

It’s interesting that both of the houses with huge opuntia plantings don’t really have much in the way of other landscaping/plantings.

There must be an interesting story here; I just wish I knew it.

All material © 2009-2013 by Loree Bohl for danger garden. Unauthorized reproduction prohibited.